
This will be a bit of a long post and involves the creation of three books simultaneously. I was inspired to create a portable chained library. Here's how.
I came across this website years back: http://www.nuernberger-hausbuecher.de
On the site you will find hundreds of images of hundreds of professions spanning hundreds of years. I instantly fell in love with this site and decided that one day I would print those images and bind them in a period looking manner so that I can bring them to events and demos. What better way to get a new person interested in our living history than to show them a book with hundreds of options. Just about everyone can find an image of somebody doing something they would like to try.
As a woodworker and a lover of being barefoot this image immediately caught my eye. The book had to be made.

I had done a little bit of book binding but never really used "period tools" so my first thought was to create a stitching frame, a book press and a frame to trim the pages. I used some hardware from Home Depot and some oak planks and built the following two tools. I know that they have a modern look to them but the technique is the same even if the hardware is metal instead of wood.


I downloaded every image from the website and then edited the image to include only the image of the page. I then printed the pages out on a modern paper which had the thickness of a period parchment. At this point I made the decision to make three books. There were some period techniques I had never tried and I hoped to eventually enter the "real" book into an Arts and Science competition. The Mendel books available cover hundreds of years. I didn't want the entry to be my first attempt and I wanted it to cover the images in the later period of the available images. I planned to make 2 versions of the same printed pages and one version of earlier years. So, from this point forward I will reference Book 1, Book 2 and Book 3 (the real book).


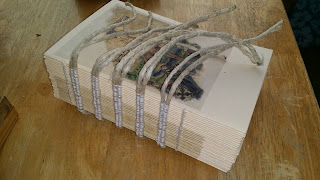
I had read that when paper pages were first available to book binders some did not trust the strength of the pages. They had inserted thin slips of parchment inside the bi-folios to stitch through. On book 1 I tried out this method to see it's viability. As you can see in this image it made the spine MUCH thicker. This caused a problem binding and cutting the pages. I continued with this approach for Book 1, but bound Book 2 and 3 without the inserted parchment reinforcements.


I had a few resources that I continually referenced but none better than this one:
The Archaeology of Medieval Bookbinding" by J. A. Szirmai.

In that book I found the following options for gothic bindings. I had done option [a] and [d] before so I decided to try something new. For Book 1 I decided to use option [b].

I used chrome tanned deer hide for the thongs and laced them up on the stitching frame.


I used cotton thread to sew the book together. Using the frame was a bit difficult at first. Sewing through the first 4 or 5 folios was tough to get my hands through. By the time I had stitched my third book I got used to it. As the book gets thicker the frame helps. For a smaller book, however, I don't think I'll use the frame.


As you can see here the pages were very rough to cut since the spine was so thick I couldn't get a good fit in the press. I used a draw knife to try and smooth out the cut with little success.


Time or another learning experience. I read that Gothic bindings should have endbands. I have never bound a book with endbands.
I placed the book in my press on an angle to facilitate stitching on the endbands.


I cut the corner off of the pages to make room for the endband.

Rather than explaining the technique on how to sew on the endbands I would recommend getting a copy of the book "Headbands : How to Work Them" which has a good step by step set of instructions.


Same process for Book 2 & 3.


To round over the spine I firmly pressed the book to shape in my bare hands. I then placed my book back into the pres trying to shape the arch of the spine as I tightened the clamps. I used a small piece of steel and a small hammer to flatten the spine. I used the steel so that I wouldn't crush or accidently strike the stitching. Striking the stiches may cause undue stress and pop the stitches.


Same approach for Book 2 & 3 only I used a double row of hemp cordage instead of leather thongs to bind the book.


I had never used wheat past before so I planned to do an experiment.
Book 1 patches were glued on using modern PVA glue from John Neal.
Book 2 patches were glued on using only wheat paste.


Book 2


After the experiment it seemed that although the modern PVA glue was easier to handle, both dried well and had the same amount of flexibility. I was afraid that the spine my crack or not hold shape. As I was sufficiently satisfied with my wheat paste experiment I chose to use the wheat paste for the "real book".
Book 3


At this point I had three sewn together books and no boards to bind them to. Woodworking began.
Here is are some images from Szirmai which show the possible board styles used for a Gothic bi


I chose option [h] for a number of reasons. Mostly, just because I liked it. If you have done any woodworking you know that a piece of wood has growth rings. Depending on how the boards are cut will determine the stability of the board when in use. I have never had the pleasure of working with quarter sawn boards before. The primary reason is due to the cost. Lumber mills optimize the number of boards they can get from a log. Based on the structure of the growth rings there are only so many quarter sawn boards that can be cut from a log. They tend to be MUCH more expensive than the simply kiln dried wood you might find at Home Depot.
Here is the cross section from the quarter sawn boards which I purchased from a local Rockler.
Based on the grain pattern of this wood I would expect it to be much more stable. I also noticed that the growth rings are tighter together than the other board purchased from Home Depot. That means this came from an older tree. The tighter the rings the more stable the wood. Well, for Book 1 I went with the good stuff. For Book 2 and 3 which required wider boards I chose not to spend the extra money.
Here you can see the difference between the wood used for Book 1 before and after planing. The thickness of the available quarter sawn wood at the local shop was just a bit too thick for the period Gothic style. I used a plane to bring the thickness down to a dimension consistent with the reference material.

Here you can see a sketch of the thickness required with the intended mounting points.

Time to measure and cut the final board.


For Book 1 I layed out the pattern and used hand tools to shape the edges.


Rough out finished.


For Book 2 and 3 I used a modern router with a jig set to cut four matching panels. You'll notice what modern power tools can do for you here. There are subtle burn marks from the router and a chip broke off when I cut the board. Time for a patch job.


I took some saw dust (of the same wood) from the garage floor. I added a small amount of glue to it to form a sawdust paste. I then spread the past on the crack. Once dry I used a file to bring the corner back true again.


Repair complete

I marked the location for the thongs by dry fitting the book.

I then placed the front and back cover side by side and marked matching locations for the leather thongs to go through so that front and back would match.

I then drilled and carved out recessed channels so that the thongs would be flush with the surface once mounted.


Same thing on Book 2/3 only this time with the help of a Dremel.

I dry fit the books and once satisfied I applied some glue in each hole and then inserted a small wooden peg to bind the thong/cordage in place.
Book 1


Trim to be flush with the surface of the board first with a flush cut saw and then a hand chisel.


Inside look:

Same process for Book 2 and 3.


When it came to leather to cover the book I had a couple options. Szimrai indicates the use of goat and pig skin. I wasn't sure which I liked better. I purchased both from my local Tandy leather. The goat has a lovely texture and is very stretchy. The pig skin however has a look which almost matches the images I've seen for extant books. I decided to bind Book 1 in goat and 2 in pig and see which I liked better.
Goat skin

Pig skin


Here is the pig skin in full glory. At this point I have to admit I was scared. I hate cutting into new leather. I tried to layout a spot which would give me the best looking piece while retaining as much usable leather for future projects.

The cut happened.


I sprayed the leather with water and then rolled it up to set for 30~40 minutes.

Once the timer went off, I unrolled it and misted it again. I then let it sit while I mixed up the wheat paste. Once mixed and ready I spread the pasts on the book and the leather. I have to say, I am not really a fan of this part of the process. I don't mind making a mess, but it was very difficult to stretch the leather while my fingers were covered in goop. Reminded me of paper mache when I was a kid. I always made more of a mess than I probably needed to.


Once satisfied with the fit and the stretch I placed the book between two thin panels covered in waxed paper and then pressed them in the book press.


Now you can see why I had all those dowels sticking out the sides of my book press. I ran some hemp cordage back and forth to press in the creases along the spine.


For Book 1 I did the same process only with the goat skin and a slightly modified paste. Still unsure of the wheat paste method I used a 50/50 mix of wheat paste and PVA glue for this book.


It turned out that the hemp cordage stuck to the glue in the binding. I had to take a small moist tooth brush to get little bits of fiber out of the creases of the binding. This time I used a smooth cotton string to tie down the binding. Glue stuck a little but didn't leave any fibers when pulled off.

Two days later the book comes out from the press.


Book 3 Same process as book 2.


At this point I had to decide what sort of finish to use. I chose to dye the goat skin but chose to leave the pig skin with only an oil and wax finish.
I tried making some of my own dye using vinegaroon and a black walnut dye. Both failed.


I decided to use a modern dye instead. I purchased these two dyes from Tandy and did a test on the goat.


I opted to go with the darker dye as I planned to trim the book in copper and I wanted a bit of contrast.
After coat 1...


A few more coats and touch ups... Book 1 and Book 3


At this point I have realized that this post is huge and I'm less than half way there. I'll end the chained library here and pick up with another entry as I begin the hardware.