Pages

Monday, January 28, 2013

Rawhide Mallet Experiment

I've been busy, but not busy posting so I'm dropping a few posts onto the blog all at one time.  This post was sort of an after thought.  Wasn't really a project on my list and wasn't really inspired by any sort of period reference.  Long story short, I went to Tandy leather to look for a rawhide mallet and was very disappointed by the price they were asking.  I found that some of my metal stamps I made were starting to mushroom on the top from using a metal hammer and so I decided to get a mallet.  The ones at Tandy were pretty, but pricy.  Yuck.  I thought to myself, "dang, how tough would it be to make one of those?"  

I dug around in the basement for an old dog chew rawhide I knew I had.  At one point, maybe 9 years ago, I planned on experimenting with making some armor out of rawhide.  I bought a dog bone from a pet store and soaked it in water for a while.  When soft enough I stretched it out and let it dry to see how easy it was to play with.  Worked well enough, but for some reason I decided against ever doing anything with it, so there the unrolled dog bone sat for some years.  


With no testing and no real plan I placed the rawhide into a big pot and boiled it up.  It didn't actually fit in the pot.  Took some doing to bend it enough to fit into my 4 quart pot.  Once it got to boiling I turned down the heat and let go for about 15 minutes.  Then I thought to myself… "crap, now what?"  I ran and got some twine from the garage and figured I just roll it up and tie it off and let it dry.  When the rawhide was done boiling I rinsed in cool water enough that I could handle it without gloves and not scream too loudly.  The rawhide thickened up a LOT!  I tried rolling it up and had some problem getting it started.  In hind sight by placing one end in a vice I might have been able to pull it tighter as I rolled it.  I was now in a bit of a rush.  I had used our kitchen cookware and my wife hates when I "do projects" with the good stuff.  I had my eleven year old daughter sand on one end of the rawhide as I pulled very hard to stretch it out as I rolled it up.  Worked well enough after she learned to keep her balance during my tugging.

I was rather surprised how well the ends even looked.  Turns out the one end is a bit thicker than the other.  I don't think the thickness of the rawhide was consistent.  Oh well, just a test.


As I looked at it I decided that the mallets at Tandy were a lot smoother and prettier.  I should trim it now while the rawhide i soft.  NOPE.  Don't do it.  I did it and yes, it looks nicer... at first.


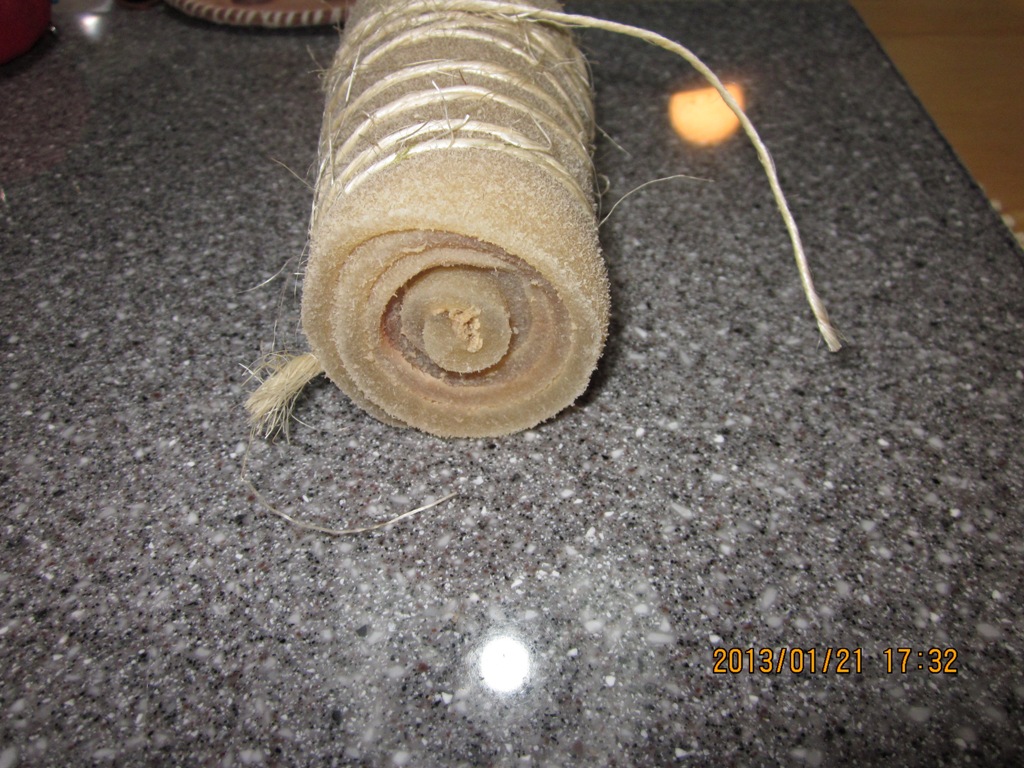
The images above were taken about 30 minutes after the rolling adventure ended.  I liked the tightness and the cleanliness of the end, but in the images below you can see that as it dried the nice smooth surface changed.  I should have probably just waited until the whole thing dried through and then take a saw to it.  Looks like I'll have to do that anyway.   These images were taken a few days of drying and a little bit of heating.


Ever impatient I started to wonder if the center would dry at the same rate.  I was wondering if the outside dried and the center didn't would it start to rot?  I resolved to speed up the process.  I placed the mallet head into a toaster over at about 150~200 degrees for about 2 hours.  I checked it every 15 minutes or so.  No issues seemed to arise.  I did that again three days later.  Still nice and tight.  So far so good.  

The images below are from the last heating.  I took the twine off since it was starting to burn a little and the mallet head shrunk enough so that the twine didn't do anything any longer anyway.  I heated the mallet to 250 for an hour and called it done.  I'm probably going to let this sit for a while before drilling it out.  The surface is VERY hard and still solid enough to use as a mallet for leather working.  I have used it without a handle already and it works fine.
 

All in all I'm rather happy with the experiment so far.  Next time I think I would keep better notes.  I think the whole project took only 3~4 days or so and only a small amount of real work.  I will probably make another of these, only bigger and with more prep work to help in the rolling of the hot rawhide.  This one I think I'll use for metal working.  I'll leave one side flat and round the other side up for dishing.  I have a copper and brass project I'm working on and a soft headed rawhide mallet might be just the trick for dishing the metal with little damage to the surface.

Olive Pit Paternoster

I have decided to make yet another new adventure into unexplored territories.  I have a few personas that I use when reenacting.  All of them should be pious gentles and should pray on a regular basis.  That is to say that they should be assumed to pray and public pretend at the appropriate times.  To better serve this acting I thought it best to add another accessory to my collection.  While doing dishes at the Vanished Woods feast I found that there were a number of bowls coming back to the kitchen area with unconsumed olives.  I LOVE olives and therefore started consuming them, as I did the dishes.  Not sure what I was going to do with them, but always afraid to throw anything away… as I ate, I kept all the pits.  I wrapped them up and took them home along with a small bowl of left over olives.

This project was spawned from that pile of pits.  I had pits of two sizes and decided that they would make a lovely set of prayer beads.  I began to clean them by boiling them for about 15 minutes.  After boiling water cooled I scrubbed each pit with a small brush to clean the remaining flesh off.  I then placed them in a safe dry place for about a month.  When sufficiently clean and dry I started taking them along with me to project nights and events.  I like small projects on the go.  I took a small carving knife, small metal file and a box of pits.  After an odd few hours I ended up with nicely polished, rounded, evenly smooth pits.


AfAfter laying them out a few times to decide if I had enough, I figured that how ever many I had was just about the right amount I would need.  Thrift planning at it's best.  Here you see the pits along with an American quarter to help gauge the size.  I took my small carving knife and used it as a drill.  I simply spun it slightly and it was very easy to pierce the end of the olive pit.  They are in fact hollow and so it didn't take much to "drill" them out.  Some had some meat still inside and so I used a small pin vise hobby drill to manually drill out and clean the inside guts out.

In the image you see here was the next step of my testing.  I wasn't sure how I wanted to finish the beads so I tested two approaches.  The small black bead was threaded onto some string and then dipped into India ink.  Nice and dark, but sort of lost the touch of the natural surface.  Pretty, but not what I was really looking for.  The slightly brownish tinted larger pit was soaked in some black walnut dye that I had made a couple years back.  Soaked it for about 2 hours and let air dry.   I liked that surface much better.  Maybe a little darker, but I really like the look of the natural surface.


I strung up the rest of the pits to get a feel of how they might look.  So far so good.  Not sure if I'll put a knot between them on the final string or not.  This was simply strung on modern thread to aid in the dying process.


Here is the black walnut dye I made.  Nice and thick and dark.  I decided to simply soak in a pot while warming over the stove.  Maybe the heat would help the dye take a little faster.


After they dye bath in warming dye I placed the beads onto a tray and warmed them in a toaster oven for 20 minutes or so.  Note I didn't head the dye to a boil.  Very low heat so that no burning would occur.  I also set the toaster oven to about 200 degrees so as not to burn the pits or crack them in the heat.  I didn't rinse them or wipe them off until after they were dry.


That round ended up making a set of pits only slightly darker than the other test pit.  I decided to try again for about the same duration to see if the dye took any better on a second run.


I was very happy with the second dye batch.  here is a photo of the first test pit and the final pits on the string.  Note that I did end up cracking two pits in the process.  Well, they didn't crack, they simply started to open up along the seam.  Not sure if that was the heat, the moisture or simply an overripe pit.  Not too bad to only lose two though.  These have been rinsed and dried with a towel. I'll let them sit for a few weeks before stringing them up.  (Maybe longer, I'm easily distracted)


Weights and Measures

I imagine that as a late period tailor I would have need for a small scale to ensure that my patrons paid using proper silver coinage.  As a slightly well off merchant I would have need to keeps my books and records and so the digging began.  After spending many hours researching on the internet and the library searching for period sources and references to small hand held scales I realized that I had collected over a hundred images.  There are a lot of extant examples of balances from the early Roman period until well past the period that I study.  I have settled on making two scales of slightly different sizes.  I found the following extant examples of chains used in the construction of the balance.  I have also seen version where a string was used.  I like metal and wanted to do a metal project and therefore settled on a chain.


To begin with I had to decide on the materials I would use.  I have very thick bronze… yuck.  I also have already drawn out copper and brass wire of varying thicknesses.  Many of the period references I found were either copper or copper alloy.  That known, I was OK with either choice.  I began a proof of concept testing phase.  I mocked up some chains quickly to see how they looked and how long they might take to build well.  I settled on the following two wires.  I chose a thin copper wire, about 22 gauge and an 18 gauge brass wire.  I would like the brass wire scale to hold up to about ½ pound of material and therefore went with a heavier gauge.  This entire project is a sort of test of a theory anyway.  Many of the scales I have seen are simply to weigh 5~10 coins.  Some  are only large enough to weigh a few coins.  That is the sort of scale I'll make of the copper wire.  I would like the brass one to be able to hold a larger bag.  I want to see how accurate I can get the scales to work when completed and be able to weigh a year's salary on one scale.


I toyed with a variety of approaches to make these and settled on two different styles.  The copper wire links are formed as a simple figure eight.  The brass ones start out as a figure eight and then have a quarter twist so that the two loops are on perpendicular plains.  I chose those two approaches mostly for practicality of construction and aesthetics.  I was able to form that shape easy enough.  After lying our a handful of options those were also my daughters two favorites and therefore they became my favorites as well.


This is another experiment.  Not sure if I will use this technique or not.  I tried twisting smaller wires together and then hammering them to work harden them.  I like the effect of the twist, but not sure if or how to incorporate that into my design.  I think I'll need some sort of decorative hook at the top and/or bottom of the chain, but not sure this approach will work for that.


Here are some photos of the various stages of the process.  I basically form the small figure eight shapes with some jewelry pliers.  I then snip the link off the wire and drop into a bin.  Once I have a bunch in that state I then take them out one at a time and strike them with a small hammer two or three times to harden and slightly flatten them.  I'm not so concerned with the hardening, the purpose of this step was primarily to flatten the link and get it ready for final shaping.  After the pieces were flattened I would then take the jewelry pliers once again and with more care try and straighten out the link to ensure that it looks balanced and shaped correctly.  This is the final quality check before adding it to the chain.

By the way, the ruler is in centimeters.


I found that it took 2~3 hours to create this small bin of links.  Not sure exactly how much chain this will make yet.  All part of the experiment.  Based on the progress so far I am guessing that a six in chain will take about two hours to construct.  Based on that estimate I'm looking at about 12 hours or so of time just to construct the chains.  Yeah, that's about how much time I was OK committing to this project.  I still have to fashion the pans and the balance arms.  Was hoping the entire project would take somewhere around 40 hours or so of labor.  The brass chain goes MUCH faster, but then again that is much thicker wire and easier to handle as well.

Once I had the approach down I simply made small bins of links and then assembled them all at one time.

I haven't constructed enough copper chain to do that mockup yet.  Here is a proof of concept mockup with a few paper clips holding the chains together on a cardboard pan.  Based on the way the chains hang, I think I either need a bigger pan, or shorter chains.  Once the real pan is added, the weight of the pan should help straighten out the slack in the chain.  So far so good I think.

Sunday, January 27, 2013

Largesse Project has been mailed


I joined an A&S Gift swap "event" called the Midlands Largesse.
http://www.facebook.com/groups/282763965120014/
The description provided is as follows:  "A&S based 'secret-gift' exchange for the Midlands Region. The swap sign up is going on now and will go through September 8. Participants will receive their recipient assignments by September 15. You will also receive information on the recipient at that time. You do not know who got *your* name until you get your gift!
This is the SECOND ROUND The object of the game is to create, for less than $25, a product that can be used by the recipient in the SCA. Items will be due by January 31, and there will be a face-to-face exchange at the Festival of Maidens. Anyone in the Midlands, or who considers themselves a Midlander, is invited to play."
After joining I received information regarding my recipient:

SCA Name: Eadric the Smith
Modern Name: Max isenholt
Persona: 10th Century Anglo-Saxon West England
Preferences: Colors are medium gray and forest green (white and black work, too); prefer to not have foodstuff; I do archery, thrown weapons, and learning blacksmithing. 
Heraldry: Gyronny argent and vert, two ravens volant and an anvil reversed sable.

Well, I did some digging around on the internet.  I felt a bit like a stalker I must say.  I wasn't able to find much in the way of useful information.  I found only one picture of the gentleman and a sample heraldry which was submitted when he registered it.

http://wurmwald.pbworks.com/w/page/1949004/Eadric%20the%20Smith


After much time spent on Google and much pondering I settled on making an Archery bracer.  Eadric went to the trouble to register his device which I was able to find on the SCA website and therefore I settled on creating something with a version of that device on it.  I decided to make a leather bracer to be used in archery.  Eadric had indicated that he did archery so I supposed that's as good an idea as any.  I had been in the mood to start doing some leather working anyway, and have never really done any tooling (since I was in Boy Scouts some 30 years ago).  I've recently been making my own leather working tools with the intent on making a bracer and quiver for myself.  Good first attempt.

This post will be the steps taken to make the bracer from start to finish.


I planned on tooling the item with his device on it, but in a more Anglo-Saxon design.  I did some digging for design ideas, but my leather tooling is still beginner so I went with some plain knot-work style border surrounding his device.

Here is the initial sketch.  Well, there were a few versions of varying sizes, this is the one I ended up using though.  I sketched it on notebook paper and then kept tweaking it to see if it would fit my arm.  I mocked up some straps, which changed 3 or 4 times along the way, as you'll see.


After mocking up on paper I cut up an old cereal box to mock up a stiffer version.  At any given time I have about 10~12 of these type boxes just for this purpose.


Here is the vegetable tanned leather I purchased from Tandy.  Honestly I don't remember the weight.  It is rather thick though.  I purchased three thicknesses and ended up using the thickest one.  The thin ones I planned on using for strapping, but threw those out and revised that plan.  This leather about 8~9 ounce leather I think.


Freshly cut out I dampened the surface and then traced the image from my design.  I used a simple ball point pen pressing hard enough to mark the surface of the leather along the way.


Once the image was marked well enough into the surface I used a home-made carving knife to cut along all the lines before tooling it up a bit.  This part was new to me.  I've only done a few mock-ups of this type of stuff.  This was my first actual project using this approach.


Thought I had more pictures along the way, but I guess not.  Knotwork was a bit tricky.  Trying to press the varying degrees of depth to make the knotwork flow nicely.  I finished this and then took it up again about 5 times adding more detail and trying to fix the shading over and over.  I might do some of this differently next time, but I guess it came out well enough.  I need to make some more tools though.  I didn't have a shader with a sharp enough edge on it.  I was pressed for time and had to use the tools I had.  Wanted to make this entirely using my own home-made tools.  I ran out of time for making new ones.  I have about 6 more styles of punches I plan on making before my next project though.


I debated about dying the surface all black, oiling it and leaving it brown or simply painting it.  I really don't like the look of painted leather.  It may be period, but I just don't like it.  I was debating between the dye and simply oiling.  I made my own vinegaroon and planned on using that.  After some issues with it I decided against it.  I applied some of the dye to a few sample pieces of leather and it looked great.  Below you can see the jar of vinegaroon I made and a few of the sample pieces.  Took only one coat and very quickly covered in a rich black.  I then tried it on another piece of leather that I tooled a bit.  Wanted to see how long it would stink and if it impacted the detail.  Stink faded after only about two days.  Detail wasn't impacted at all.  Issue I found was that there was some oil stains on the leather.  I feared that my tools would rust after non-use so I coat them with a light coat of oil.  I thought I cleaned them all off, and yet the dye had trouble coating nicely.  Must have been dirt from the leather store or oil from my tools.  Either way I had a problem.  I posted on some leather working boards for ideas.  Got some ideas.  None really worked well enough.  Went to Tandy and spoke with an instructor.  He recommended an oil based dye.  We tried that and it didn't cover well either.  He also recommended a deglazer and oil.  I used the deglazer to clean the surface and then coated it with neatsfoot oil and let sit for a day.  He indicated that the oil would open the pores and allow the dye to soak in well.  It did.  I coated better, but not enough for me.  I was really worried about getting 1/2 way across the surface and finding a blemish which would not coat.  Next time, when I have more time I'll do it on my own piece.  Time was a factor and I ended up simply treating the leather with the oil alone.


Since I wasn't going to add color to the surface I used a heraldic blazoning technique to demarcate the green areas.  The color green (vert) is indicated by a diagonal line from top left to bottom right.  I scored the surface of the leather with a knife lightly before applying the oil in hopes that it would show enough.


Here is the oil I invested in from Tandy leather.  As you see, the straps I have here are not the ones I had above.  Those were not thick enough.  I made a new set.  Those sucked too.  I tried making a buckle, but it didn't have the movement I wanted and so I broke down and bought a brass buckle from Tandy.  Bummer.  Next time... more time... I'll make the buckle.


Here is a close up of the leather used for the straps.  It is a much softer already dyed leather that I bought from a vendor at an SCA event.  I purchased a bundle of "scrap pieces".  Lots of odds and ends and small pieces for small project stuff.  I wasn't crazy about the color, but once I dyed the other stuff I was OK with the two tone look.  I hope the recipient likes it as well.  I used a brass riven to hold the buckle on.


The FINAL piece.  These are the last pics before I stuck it in the package to send out.  The strap was quite a bit longer that I would need, but I'm not sure how big the recipients arm is.  Hope he can cut it to size easy enough.