Pages

Monday, May 28, 2012

Well, not all designs end up in the finished product.  I wasn't exactly sure what I wanted to trim the sleeves.  I wanted some sort of blue stripe across the panes where they were gathered, but I wasn't sure exactly how I wanted to construct the trim.  I tried the following four ideas which looked a lot better in my head than then did on the sleeve.  I took the pictures for posterity and then quickly tossed them into the trash.


Here is the final design that I ended up going with.  I used a heavy weight cotton thread to tack down a strip of blue wool (that I got from another coat).  The blue coat matched pretty close to the shade of blue of the silk that I had as the sleeve backing.  

Took some time, but I think it was worth it.  I really like the patter and the color as an accent.  Adds a little bit of design without too much over embellishment.

Here is the final sleeve stitched closed for the last time.  I know, it ain't pretty.  Frankly, I'm not sure why I took this picture other than because it was one step in the process and In knew once I turned it right side out, it would never look like this again.

I still have some finishing touches to to on the blue trim to close it at the seam, but for now the sleeve is wearable.  You can see that the sleeve is slightly more puffy than the last mock-up.  I stuffed each section with a strip of a cotton shower curtain.  I got the curtain from a garage sale free-bee.  Was a loose decorative cotton mesh with a little embroidery on the edges.  I cut it into strips and fed a strip inside each of the five sections of the sleeves.


Now, it is ready to wear.  I'm really happy with this, even though it has taken three times longer than I thought it would.  So far the hand sewing notion seems to be still doable.


Sunday, May 20, 2012

German Tellerbarett for Landsknecht outfit

Not much to show for this one, so far.  I've started some sketches and plans for a new hat.  This one won't be hand stitched and is more about the final look than it is about he period construction.  So far I have four pieces of cardboard glued up together to form the base of the hat.


Dang it is big!


Here are some updated sketches I've made to get an idea how the layout and location of the feathers will look.  I am still not certain on the colors of each section though.  I may make a colored mock-up or simply start working on it. On the left is the top view of the hat and on the right is the bottom view.

Red Leather gloves

I started a pair of red leather gloves to go with my red and black leather and silk outfit.  This project has been in my to do bag for a while.  We were selling stuff as part of a multiple family garage sale this past weekend which gave me plenty of time to simply sit and sew.  I finished one of the gloves and now I suppose I'll wait another 6 months before the other is completed.


The following was added on 1/28/2014.  I finally got around to completing my gloves.  These have been in a small bag which I tend to carry around with me to events in the event that I have no other projects to keep my hands busy.  At an event this past weekend I finally got around to finishing the left hand.  Unfortunately the outfit that they were designed to go with no longer fits.


Landsknecht sleeve panes assembled

After all the slashes have been completely jointed and cut to length I was ready to assemble.  This is the final layout of the pieces ready for connection and attachment to the sleeve.

Here is the layout compared to the silk sleeve.  You can see that the strips are about 45 inches and the sleeve is about 24 inches long.

I ran a single silk thread through the center of each strip of wool that I could then use the gather the panes together.  The wool is rather thick and you can see in the image below I was able to pierce the center of the strip very nicely.


After all the pains were joined together I tightened the basting thread to gather the panes to the correct width that was required to fit the sleeve it would be tacked to.  I then placed the panes onto the sleeve and pined each pane down in the proper place to check the layout.  I found that I was not able to gather the wrist as much as I liked and therefore simply overlapped the purple and teal panes on top of the black.  It was sort of difficult to gather 24 inches of panes into about 9 inches around the wrist area.

Here are all the panes pinned and ready to stitch.

And... I'm done!  Took a ton of time, but I'm really happy with the look so far.  I am still pretty sure that I will stuff the sleeve a little bit.  I have some cotton mesh which was sold as a shower curtain lining.  It is rather stiff and will hold up some body and at least it isn't plastic or polyester.

My next step will to be to create some blue and/or purple straps to cover up and accent the section where the panes are bound to the sleeve.  Not sure exactly what or how I will do it yet.  I have a design in my head, and I have some blue and purple leather and blue wool coat I bought.  I have to play with some designs before I continue on the real sleeve though.  I can't wait to see one sleeve done and the design final.  At least at that point I can start plugging away at the second sleeve without thinking much about the design and simply focus on the process.

Lots of slashing getting ready

The layout process has begun for the final assembly.  I used a pattern board.  I don't know the technical name for it, but it is simply a large piece of cardboard with a grid drawn on it.  It is used for laying out patterns.  I picked this one up for $2.50 at Salvation Army.  I used some blue painters tape to mark off the lengths of each section.  Since I had obtained my wool from various coats, the size of wool strips I had was varied.  I knew that I would have to splice some sections together to make the final strips and wanted any seams I made to fall on the section of the gather so as to best hide the seam.

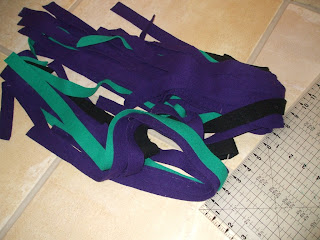
Here is the piles of strips waiting to be collected, measured and joined.

I started by laying out all the pieces which would make up each sleeve.  I chose the pieces which would best get the most out of each piece of wool with the least amounts of seams which would show.  This is the final layout and the splicing can begin.


I spliced all the sections together by whip stitching the ends together.  I did all the splicing using silk thread as close as possible to the color of the wool.


After flattening out the butted ends you can see that when the seam is tightened the wool tended to splay at each end.  I simply used a straight edge over the seam and trimmed the edge nice and straight again.


Finished seam ready for assembly.  This shows up quite easily in this photo, but when the final garment is viewed the seam is virtually invisible as I aligned each splice to fall right on the area of the sleeve which would be covered up by further embellishment.


Wednesday, May 16, 2012

Landsknecht sleeves coming along


After completing the mockup, I tweaked the pattern a bit.  I looked at my photo of the sleeve mockup side by side with the concept sketch I made.  I decided to alter the panes by making them about 50% thinner.  That means a lot more cutting and layout work, but it will also make it easier to use up more of the coat.  When you chop a wool coat up there are a lot of seams, pocket holes, button holes etc.  Those holes and seams which get in the way when laying out a patter.  With the thinner panes I will likely get more use out of the wool provided from the coats.  I chose to alter the size of the segments of the sleeve as well.  Previously with the mockup I was not happy with the smallest segment by the wrist.  I spaced them out differently.  The sleeve outside length is 27 inches.  The segments are 4”, 5”, 5”, 5” and 7”.  I also think that I will put a small amount of padding in each of the upper sections to produce a little more volume.  The silk looks nice now, as it is, but doesn’t have the body I was hoping to produce the look I intended after the wool strips are applied.
Here you can see a side by side of the most recent mockup, the original sketch and the final hand stitched silk sleeve.


I have chopped up enough teal and purple for the sleeves.  Ran out of energy cutting up the black and will have to continue another day.  So far the progress is slow going, but looking good.  The strips are only one inch wide and any variation off the straight line is very visible.  It seems to take more focus than I would have expected to simply cut a bunch of straight lines.


Tuesday, May 15, 2012

My first Kingdom Scrolls completed

I finally created an entire scroll including the Calligraphy.  It was with a little trepidation that I submitted my name to the list of volunteers to create Kingdom award scrolls.  I was given the chance to create two scrolls for the court this past weekend.  This meant that I would have to write the text, do the calligraphy and the illumination.  I must admit that I was more than a little worried about the assignment.  I had never met either of the two individuals who would be receiving my work and I wasn’t sure exactly how to go about things.

This was the scroll assignment that I received:
Court of Their Majesties Savaric and Julianna
Constellation Academy of Defense V
May 12th , 2012 A.S. 47
Shire of Mynydd Seren

1) Arlecchino (Randy Winderlich) Constellation/Mynydd Seren - AoA
Assisted in procuring new members via numerous demonstrations, dancing,
faithful reconstruction of the Commedia Dell'arte character Arlecchino

2) Chernislava Alekseeva (Lisa Coss) Constellation/Mynydd Seren - Dragon's Barb
Exemplary skill with a bow and devotion to the teaching of
archery, assisted in the running of the line and in preparation for event,
and helped train novice archers in both basic and advanced techniques.

Given that I had never done this before I wasn’t sure exactly what to expect when receiving an assignment.  Silly old me thought that the text would be prepared for me.  I thought that perhaps the Crown would be interested in approving the text prior to signing a scroll.  I went through the scribal handbook and drafted the following text for the scrolls:
Proclaim to all unto whom these presents come that we, Savaric and Julianna, King and Queen of the Middle Kingdom have heard of the many good works and labors, especially in the aid of procuring new members via numerous demonstrations, dancing, and faithful reconstruction of the Commedia Dell'arte character Arlecchino.  We are therefore minded to bestow upon Arlecchino of Mynydd Seren the right to bear arms as registered within the society without let or hindrance from any person, and the rights and responsibilities conveyed by his elevation to this rank from this day onward.

Done by our hands this 12th day of May, 2012, Anno Societatis 47.

Pray let all know that we, Savaric and Julianna, King and Queen of the Middle Kingdom have heard much good of Lady Chernislava Alekseeva.  She has demonstrated exemplary skill with a bow, a devotion towards archery instruction, a willingness to serve at events and eagerness to train novice archers in both basic and advanced techniques.  We are therefore minded to create her a Companion of the Order of the Dragon’s Barb.  We bestow upon her all rights and responsibilities attendant upon this rank, and the right to bear the badge of the order without let or hindrance from any person.

Done by our hands this 12th day of May, 2012, Anno Societatis 47.
I then tried to do a little research online to see WHO these people actually were.  I was able to find some information about Lady Chernislava Alekseeva, but little about Arlecchino. 
Lady Chernislava Alekseeva – Dragon’s Barb
The information I found about Lady Chernislava Alekseeva seemed to indicate that she had a Russian persona.  As is common in the SCA it seemed that her persona didn’t necessarily hold true to a certain location or time period.  I found pictures of her in various forms of garb, including Japanese while doing drumming.  Rather than try an emulate a Russian manuscript I simply chose to do something based on a page from a book of that time period where the illumination would match the award being given.  As she was very active in archery and was receiving the Dragon’s Barb, I hoped that she would appreciate a period painting based on the a page from a book owned by Catherine of Cleaves.  I altered the illumination slightly to allow for the badged at the top.  I also chose to use the recipients heraldic colors as my main color scheme.
As this was my first attempt at calligraphy I found that I had to do this portion 4 times before I ended up with a product I was satisfied with illumination.
Here is an image of the calligraphy.

I then sketched the illumination using a mechanical pencil.  When I was satisfied with the layout I inked the design in with a metal nibbed quill pen using India ink.
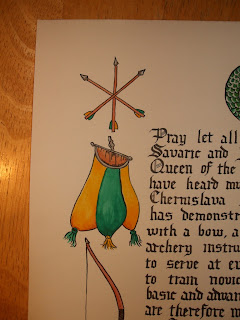
Here is an image of the fully inked scroll ready to receive paint.


The remainder of the scroll was done using gouache paint applied with a brush.
Here are some close-ups and the overall completed scroll.


Arlecchino – AoA
I couldn’t find much in the way of information via the internet for Randy Winderlich.  I was able to find many images of the various portrayals of the Commedia Dell'arte character Arlecchino.  I chose to simply to a late period vine work edge with a caricature of Arlecchino and the mask worn by the character.  Here are some images I found which inspired the final design.
This was only my second attempt at calligraphy I found that I had to do this portion 3 times before I ended up with a product I was satisfied with illumination.  Turns out that I spelled the recipients name wrong and had to start over.  I then used my prior copy as the basis of my text and therefore ended up spelling it wrong again.  Ughh!
Here is an image of the calligraphy which I ended up using.

I then sketched the illumination using a mechanical pencil.  When I was satisfied with the layout I inked the design in with a metal nibbed quill pen using India ink.  I know that this isn’t a period design, but for this recipient I hoped that the free hand caricature of his inspiration would be appreciated.
Here is an image of the fully inked scroll ready to receive paint.

The remainder of the scroll was done using gouache paint applied with a brush.
Here are some close-ups and the overall completed scroll.